
Suede Loafer Sample Development: 8 Details Buyers Should Approve
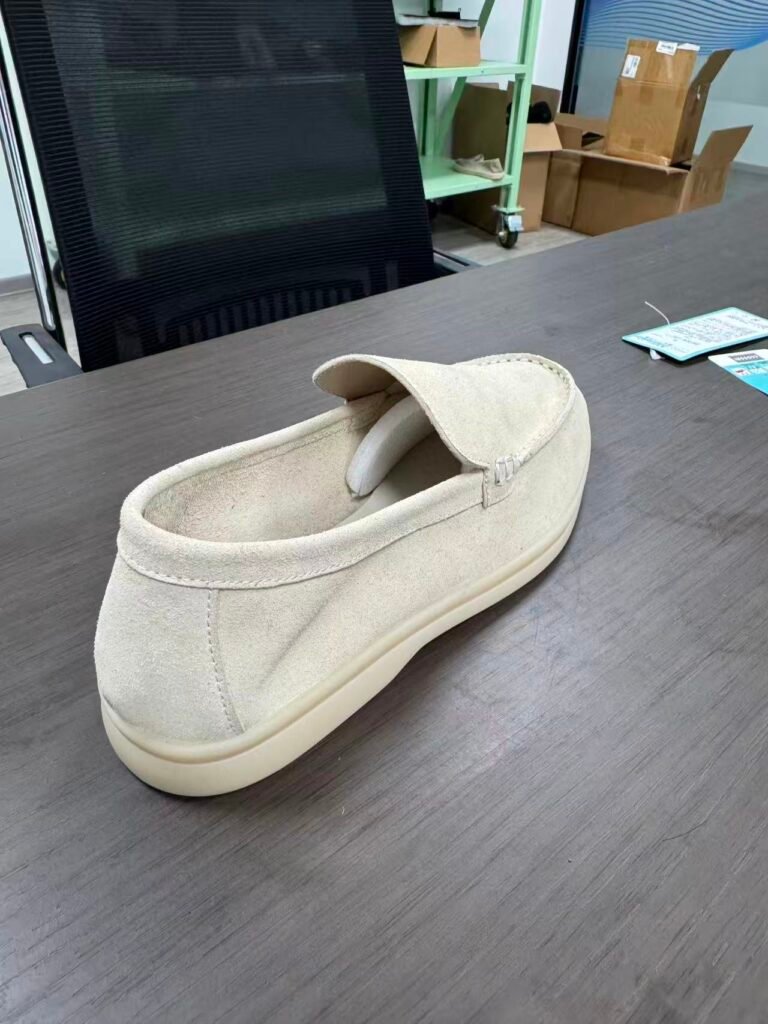
A good-looking loafer sample is not automatically ready for production. Before approving an OEM prototype, buyers need to evaluate the details that affect fit, consistency, durability and the final retail presentation.
Use this eight-point suede loafer sample development checklist to give your supplier clear feedback and reduce expensive changes after bulk materials have been ordered.
1. Upper Material and Nap Consistency
Review the upper in neutral daylight. The nap should look consistent across the vamp, quarters and heel. Brush the surface gently in different directions to see whether the shade changes evenly. Compare both shoes as a pair and look for unexpected variation, thin areas or surface damage.
This sample uses a cow suede upper. Record the approved hide selection, thickness, color, nap direction and surface feel. A verbal description such as “light beige suede” is not enough for repeatable production because natural cow suede can vary between hides and dye lots.
2. Color Under Different Lighting
Light neutrals can shift from cream to gray or yellow depending on lighting. Check the sample under daylight and standard indoor light, then compare it with the approved swatch. Define an acceptable shade range before bulk cutting begins.
The outsole, thread, lining and edge finish should also be reviewed together. A nearly matching component can still make the complete shoe look inconsistent.
3. Apron-Toe Shape and Stitching
The apron seam is a focal point on a loafer. Check that the toe shape is smooth, both sides are balanced and the stitch line follows the intended curve. Review stitch length, tension, thread color and the distance from the material edge.
Photograph the approved seam from above and from the side. These images, together with the signed sample, provide a useful reference for inline inspection.
4. Last Shape, Instep and Heel Hold
Because loafers do not use laces, fit depends heavily on the last and topline. Test the reference size for toe allowance, instep pressure, heel slip and entry comfort. The heel should hold securely without creating excessive pressure at the topline.
Confirm the target market’s size standard and test more than one size before approving grading. A shape developed around one reference size can change noticeably at the ends of the size range.
5. Lining, Sock and Internal Comfort
Feel inside the shoe for rough seams, wrinkles and exposed edges. Check whether the lining supports easy entry and whether the sock stays flat. If cushioning is part of the product brief, measure or record the approved foam specification instead of relying only on hand feel.
Brand logos and size information should be legible, correctly positioned and resistant to normal rubbing.
Record Measurements, Not Only Visual Comments
A sample can look correct in a photograph and still differ from the approved fit. Record key measurements such as internal length, ball width, topline opening, heel height and outsole length using an agreed measuring method. The specification should state the tolerance for each point and identify the reference size.
This measurement sheet becomes especially important when production covers a wide size range. It gives the factory and the buyer a common standard for checking graded sizes instead of relying on a subjective statement that the shoe “looks right.”
6. Outsole Flexibility and Bonding
Flex the shoe at the forefoot and inspect the bonding line around the toe, waist and heel. There should be no visible opening, excess adhesive or uneven sidewall. The outsole should sit straight when viewed from the back.
Discuss the appropriate tests with your supplier, which may include flexing, adhesion, abrasion or slip-resistance checks depending on the intended market and use.
7. Pair Matching and Symmetry
Place the left and right shoes side by side. Compare toe shape, vamp length, opening, heel height, stitch position and sole alignment. Pair matching matters especially with suede because differences in nap direction or shade can be immediately visible at retail.
8. Branding and Packaging
Approve every private-label element on the physical sample: sock logo, size label, outsole mark, hangtag, tissue, shoe bag and box. Check that packaging does not press or mark the upper during transit. For light-colored materials, test tissue paper and printed inserts for color transfer.
Turn Feedback Into a Production Standard
Send sample comments in one organized document. Number each issue, include a clear photo and state the required correction. After revisions, confirm which sample is the final reference and keep one signed pair with the factory.
Separate mandatory corrections from optional ideas for a future version. When comments are mixed together, a supplier may not know which changes are required for approval. Include a revision date and version number, then ask the development team to confirm each completed item before sending the next sample.
XuFan Footwear provides sample development, material sourcing, private-label branding and bulk production for OEM suede loafers. Sampling normally takes 7-15 days after specifications and materials are confirmed, while standard production is typically 30-45 days after approval.
Explore our factory and production workflow, or send your loafer reference for a development review.